วิธีให้ Ansible เชื่อมต่อกับ VM ที่สร้างโดย Vagrant
Vagrant มีคำสั่งที่สร้าง ssh config
vagrant ssh-configเราสามารถ pipe เพื่อ create file ได้ด้วย
vagrant ssh-config > ./ssh_configแล้วเราสามารถสร้าง inventory.ini ได้แบบนี้
[vagrant]nginxapacheโดยไม่ต้องมี ansible_host=127.0.0.1 ansible_port=2222 ansible_user=vagrant ansible_ssh_private_key_file=path/to/private_key
เพราะถ้ามี variable เหล่านี้ Ansible จะ Ignore Host ใน ssh config แล้วใช้ใน inventory.ini แทน (⚠️ ระวังตรงนี้ )
ลองสร้าง playbook.yaml แบบ simple เพื่อ Test
- name: My first play  hosts: all  tasks:    - name: Ping my hosts      ansible.builtin.ping:
    - name: Print message      ansible.builtin.debug:        msg: Hello world
แล้วรันด้วย
#!/bin/sh
export ANSIBLE_HOST_KEY_CHECKING=Falseexport ANSIBLE_SSH_COMMON_ARGS="-F ssh_config"
ansible-playbook -i ansible/inventory.ini ansible/playbook.yaml
Explain
ANSIBLE_HOST_KEY_CHECKING ปิด prompt แบบข้างล่างนี้ตอน ssh ต่อ host ที่ไม่รู้จัก
# This key is not known by any other names.# Are you sure you want to continue connecting (yes/no/[fingerprint])?ANSIBLE_SSH_COMMON_ARGS specify path ไปที่ ssh config จาก vagrant ssh-config
ด้วย value "-F ssh_config" แล้วให้ ansible เรียกใช้ file นี้แทน
Command:
ansible-playbook -i ansible/inventory.ini ansible/playbook.yamlWHERE
-i ansible/inventory.ini คือ path ของ inventory
ansible/playbook.yaml แล้วตามด้วย path ของ playbook
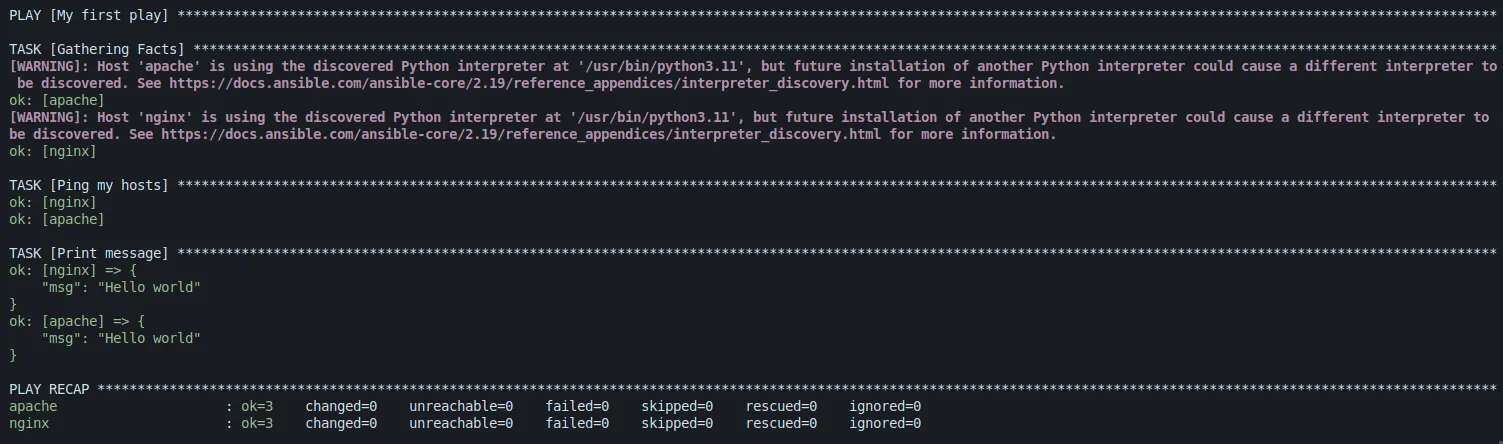
Output
เท่านี้เราก็สามารถใช้ Ansible จัดการกับ Vagrant ได้แล้ว 😄
Source code
https://github.com/wuttinanhi/hello-vagrant/tree/vagrant-ansible